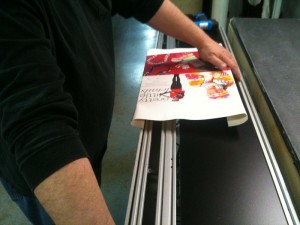
The natural tendency for operators is to stretch the canvas as quickly as possible, affix the staples and move on to the next order but this isn’t always the best option especially when stretching large artwork. Large stretcher frames require a lot of canvas which has a tendency to droop in the middle. This drooping canvas must have the slack taken up just to get to the point where it can even start to be stretched. The heavier the canvas the more slack must be taken up.
Technique #1: Remove the slack and regrip
Create the starter course as you normally would. Place the assembled stretcher bar into the loaded position (on top of the stretcher blocks). Open the clamping bar and insert the loose end of the canvas into the clamp. Move the artwork forward and with the heel of your palms try to pull as much slack out as possible. One technique we recommend is to build-up the void with a filler using foam core blocks or pads. These could be pre-made panels that can be quickly put in place and removed when done. These would only be used for large artwork.
The next step is to initiate a stretch using a relatively low pressure setting. At this point we are just trying to remove the slack. We even recommend releasing the stretch bar and reclamping just to pull more slack out and then rest reach it.
Technique #2: Promoting the stretch angle
The Gallery Stretcher works on a horizontal plane. This is the ideal position for affixing staples and monitoring the alignment but it does require more stretching force to overcome friction as it drags across the edge of the stretcher bar. After all, we are trying to force the canvas 180 degrees in the opposite direction. That is why we recommend allowing the artwork to rise slightly to promote the stretch. A small canvas, as seen above, wants to rise during a stretch and that is why the operator should keep their freehand on the outside rail to prevent it from “popping off” the stretcher blogcks. Very large artwork might not lift much at all during the stretch and that is why we urge you to prop the artwork up 3-4″ using a cardboard roll or similar device just to reduce the angle. Anytime we can reduce the angle of the stretch we create less drag.
Technique #3: Wait for it
I was conducting a stretch on a large canvas during a tradeshow and while I was preparing to staple the underside I watched the image “creep” over the edge of the stretcher bar. Had I stapled it immediately after the stretch I would not have gotten a very good stretch. This is not to say that all canvas behaves like this. Temperature, humidity, canvas weight and the radius of the stretcher bar are all factors
Technique #4: Tap Test
With the pad of your index finger tap lightly on the sides of the stretcher bar. A dull sound would indicate that the canvas has gathered on the side and formed a “pillow”. This means that the canvas has not traveled sufficiently over the radius. Remember, we are trying force a fabric over to relatively sharp edges. If the edge does not have a pronounced radius it will create friction and the canvas will not travel over both edges. A high pitch sound indicates that the canvas has traveled and is “flat’ against the side of the stretcher bar.
Summary
Try these 4 simple techniques the next time you stretch art on canvas and you will produce a much tighter and more lasting stretch than ever before.


Comments are closed.